
User manual · Chapter 6
The photo viewer
Tap any photo in the gallery to see it full screen. The viewer is where you check focus, read the exposure, fix the framing and send a photo on.
Viewing a photo
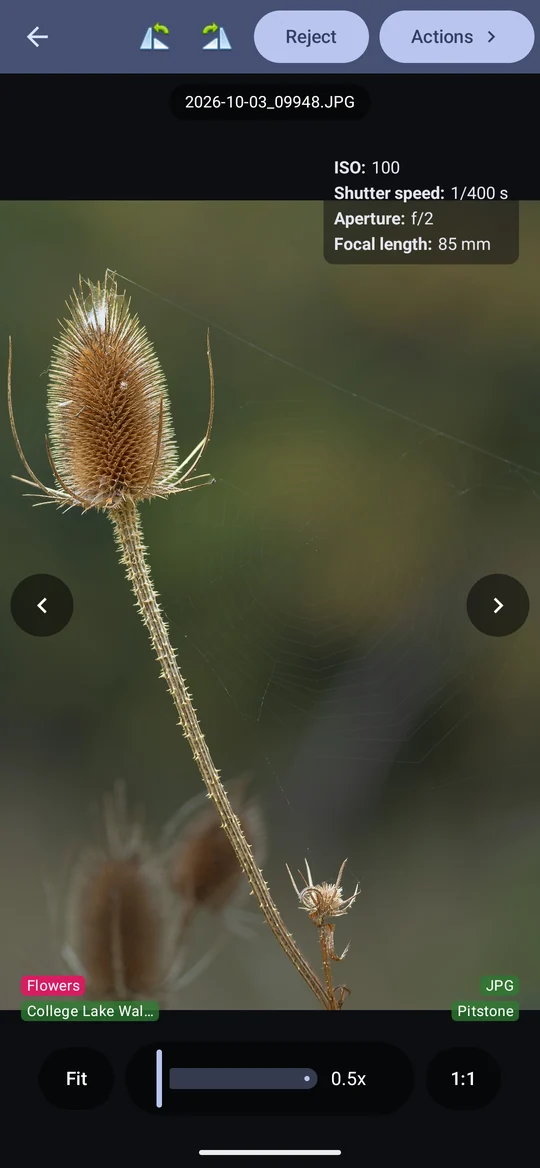
- Move between photos by swiping, or with the ‹ › arrows at the sides.
- Zoom by pinching or double-tapping, or with the bar at the bottom: Fit, a slider showing the current zoom, and 1:1 — one pixel of the photo per screen pixel. While zoomed in, dragging pans the photo instead of changing photo; use the arrows to move on.
- Rotate left / Rotate right in the title bar turn the photo a quarter at a time; Reject marks it rejected (see Rejecting).
- The badges along the bottom are the same as the gallery's, with room for more tags before they collapse into "+N". A photo's title, if it has one, sits centred at the top.
The EXIF overlay
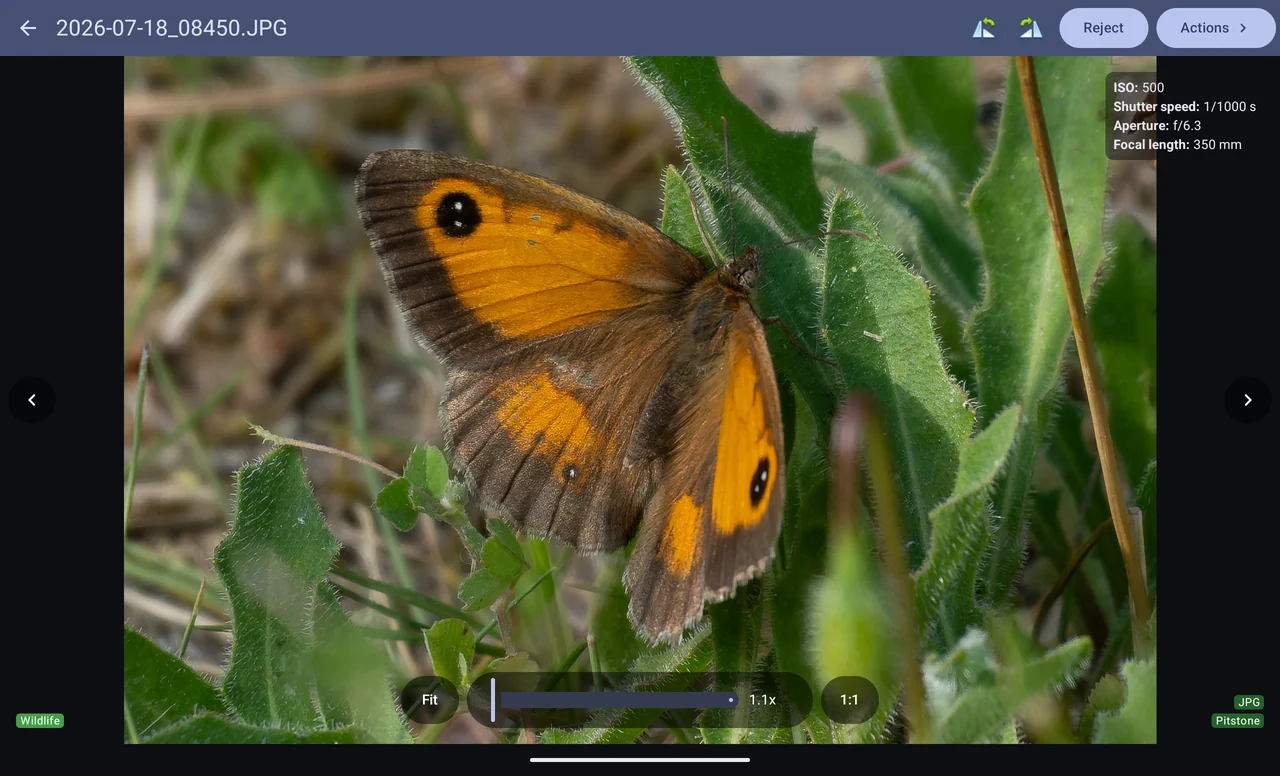
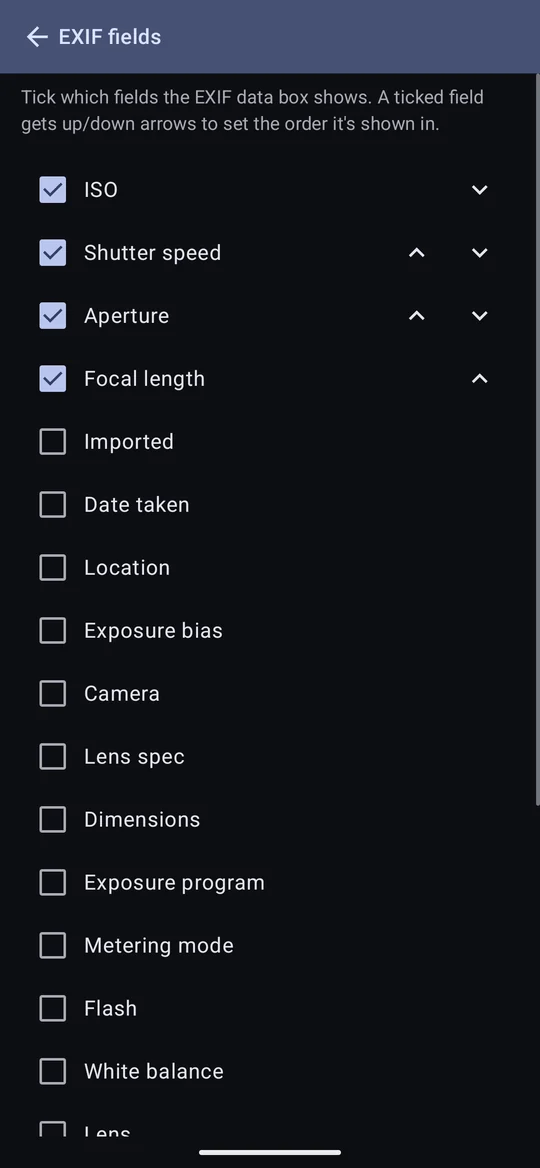
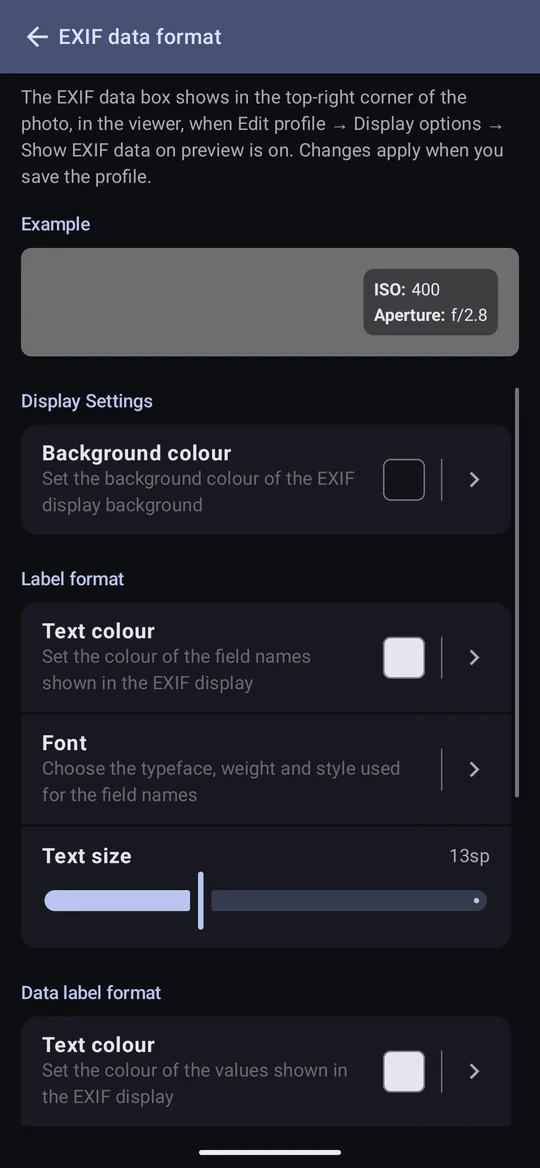
The box at the top right of the photo shows the exposure details you choose. It is switched on per profile: Edit profile → Show EXIF data on preview. Tap that row to choose its fields — ISO, shutter speed, aperture, focal length, imported, date taken, location, exposure bias, camera, lens, dimensions, exposure program, metering mode, flash, white balance — and the up and down arrows beside each ticked field to set the order. A newly ticked field goes to the end.
EXIF data format, just below it, styles the box: its background, and the colour, font, weight and size of the labels and of the values, separately. The colours default to automatic, following the light or dark theme; choosing a fixed colour for one of them stops it following. The example on that page shows each change at once; the viewer shows it once you save the profile.
The metadata screens
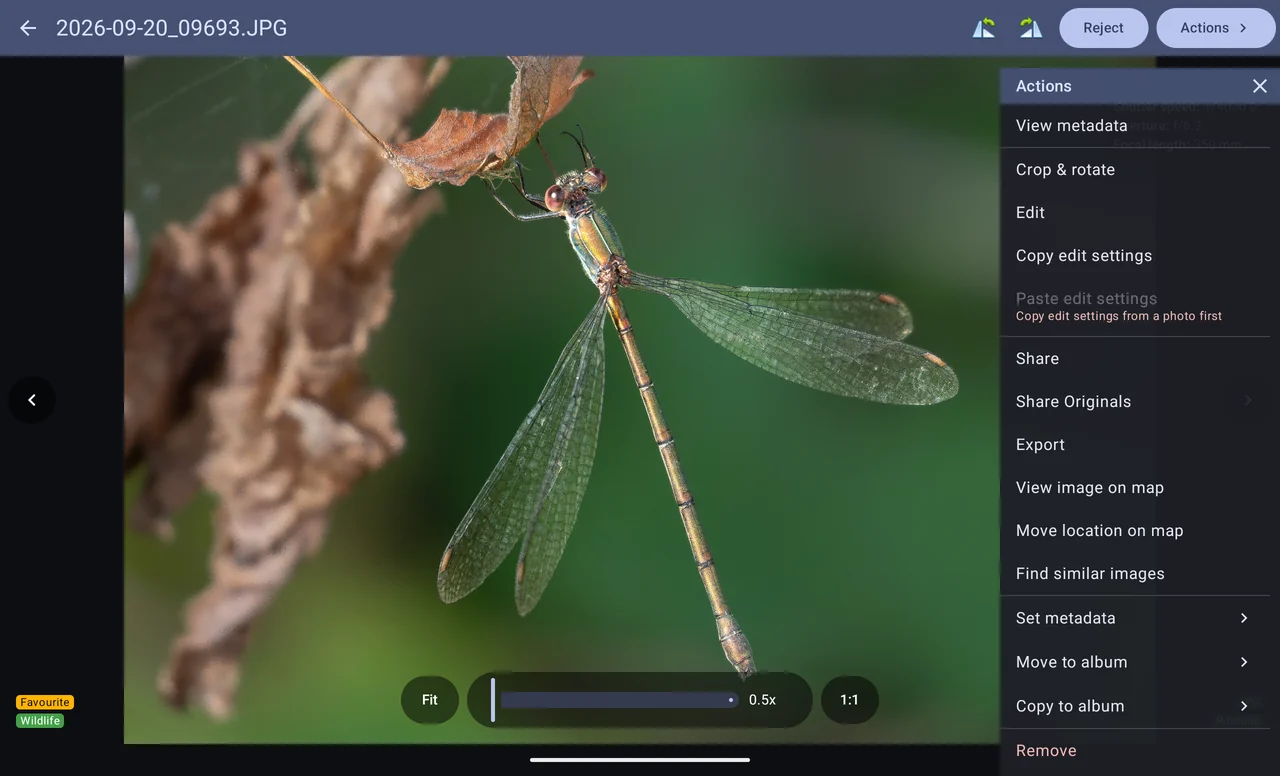
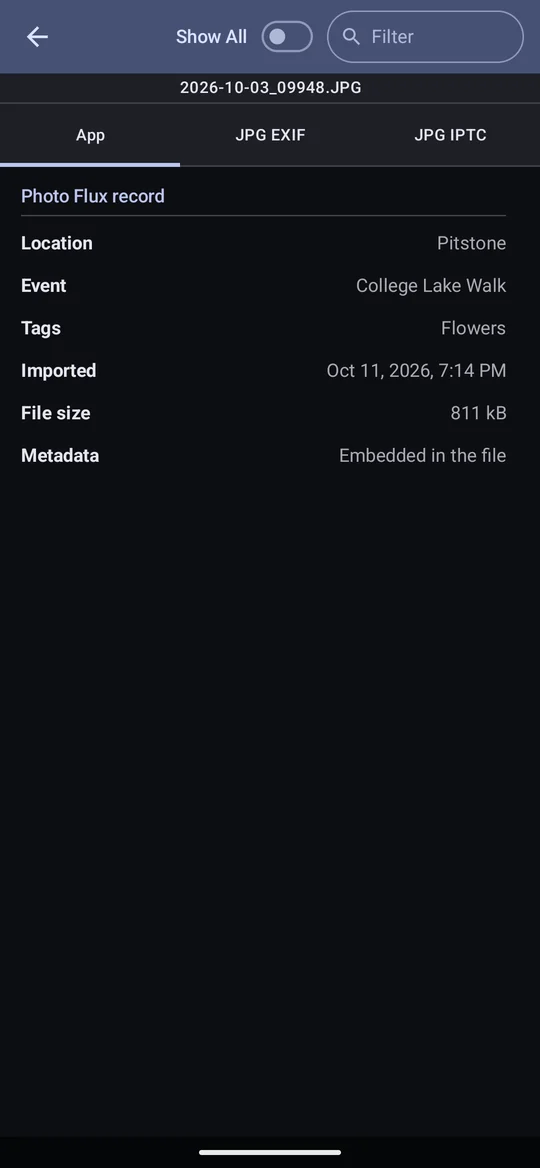
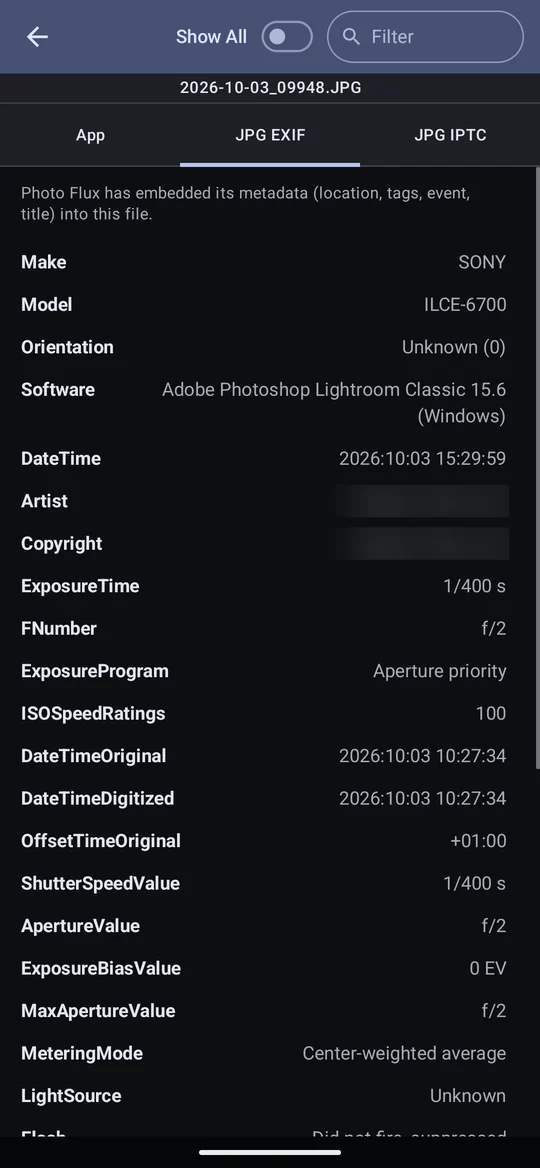
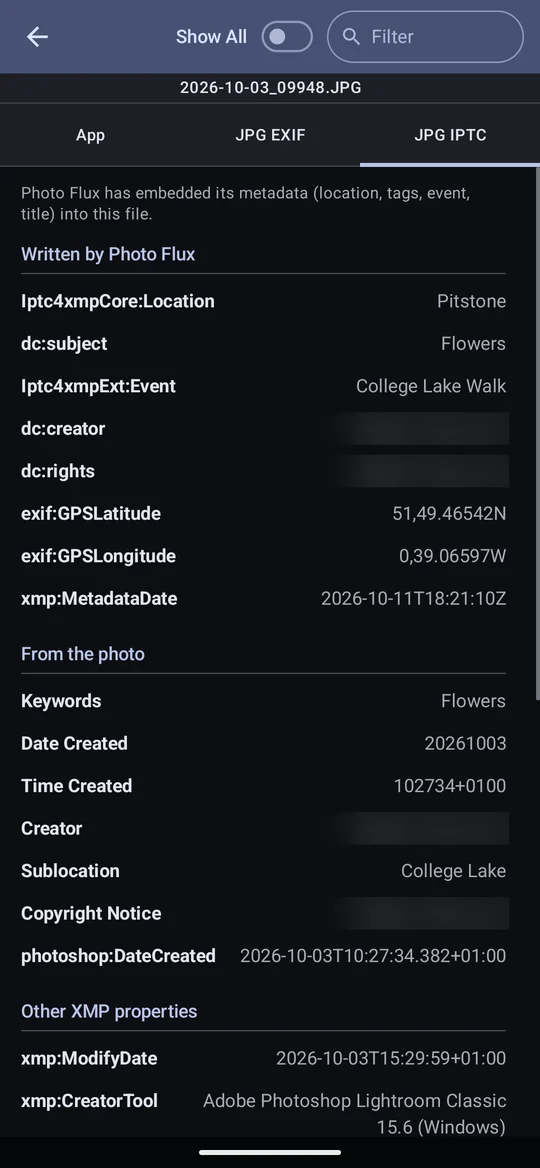
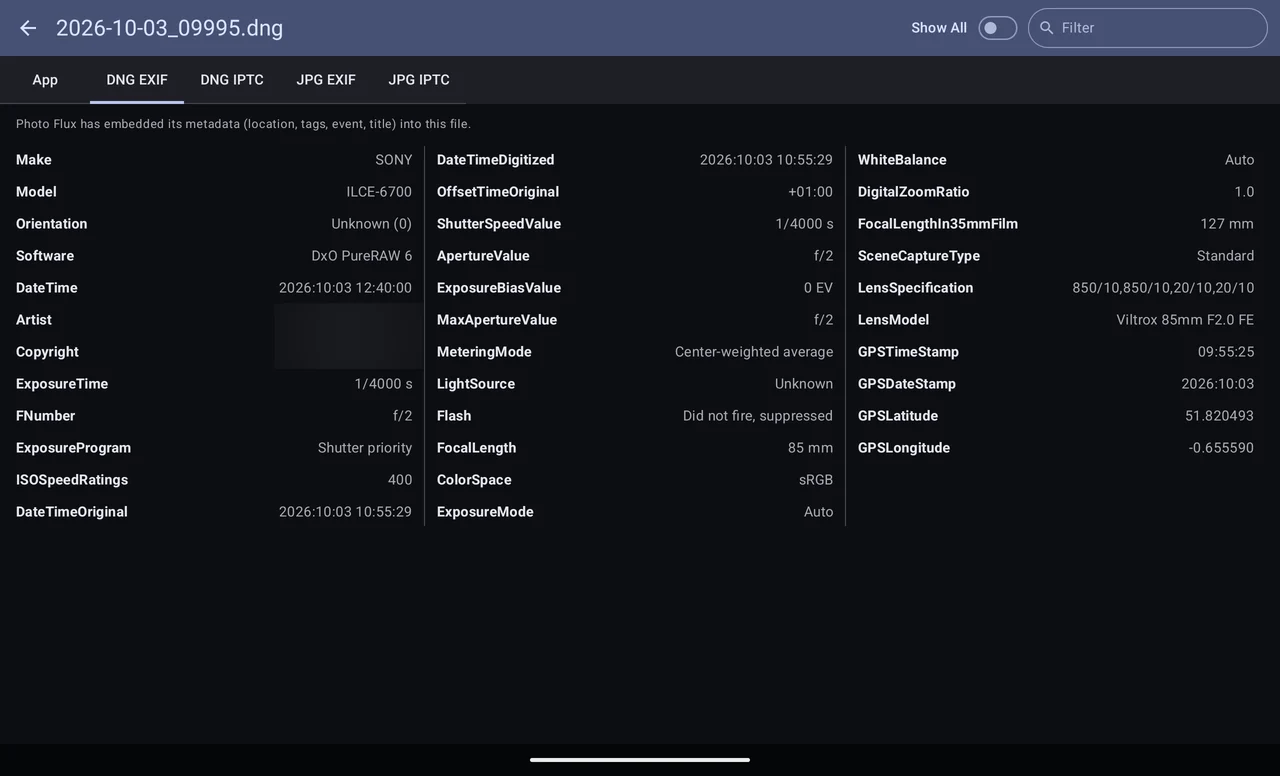
Actions → View metadata shows everything known about the photo, in tabs:
- App
- Photo Flux's own record: location, event, tags, title, when it was imported, file size, and where its metadata is kept — Embedded in the file, in an XMP sidecar, or not written.
- EXIF
- The camera's EXIF fields. A RAW+JPG pair has one tab for each file's EXIF.
- IPTC
- What the file (or its sidecar) actually says, read back from the file rather than from what Photo Flux believes it wrote: what Photo Flux wrote, what came with the photo, and any other XMP properties from other software.
Show All includes fields that are usually noise; the Filter box finds a field by name.
Crop and rotate
Actions → Crop & rotate is free, and non-destructive: the file on disk keeps every pixel it arrived with. Only metadata is written, so Reset gives the whole frame back at any time, however long afterwards.
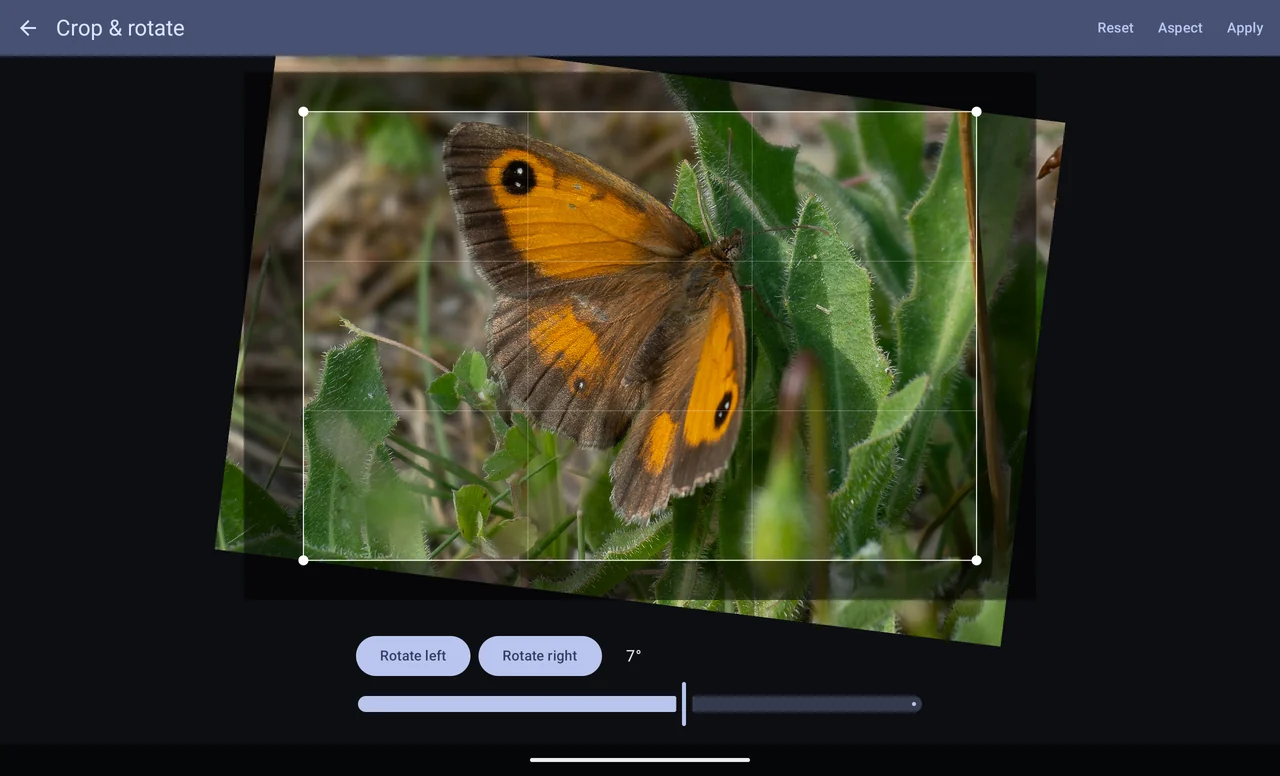
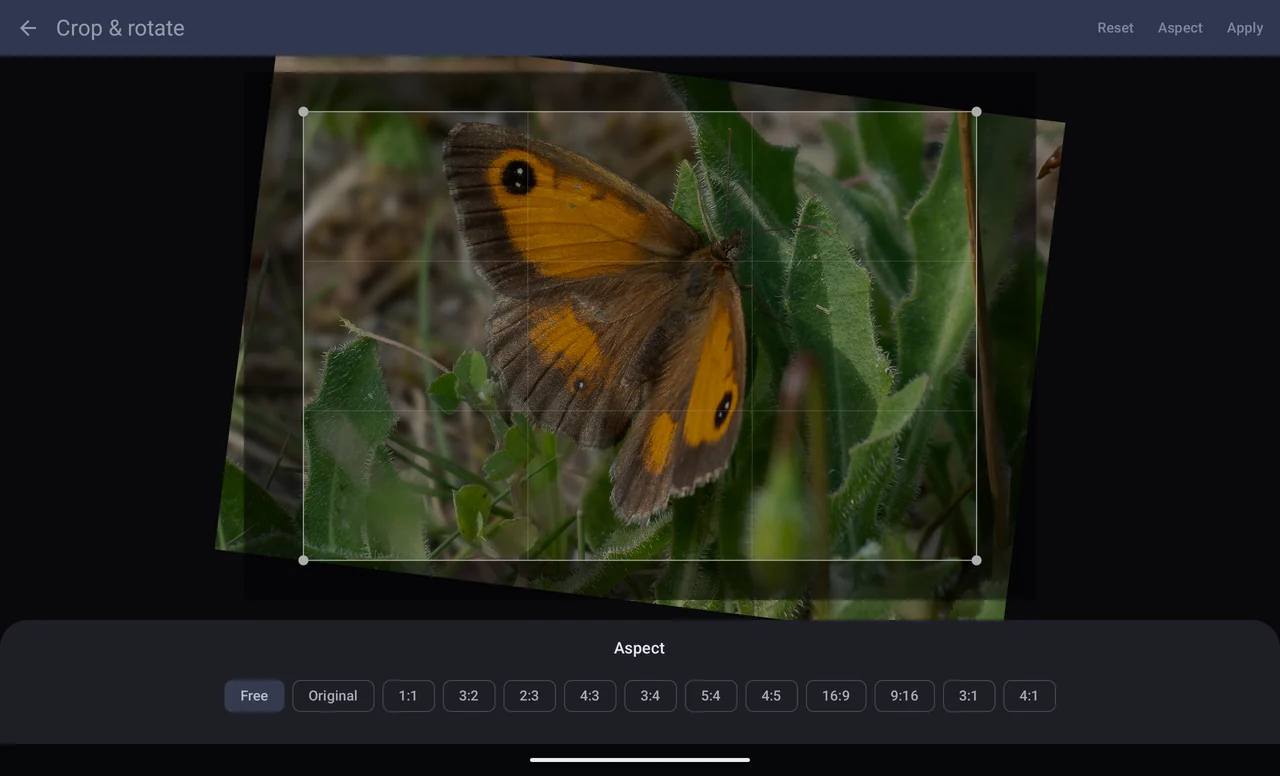
- Crop: drag inside the box to move it, outside to pan the photo, and the corners to resize. Pinch outside the box to zoom in and place an edge exactly — that zoom is only how you're looking, never part of the crop. Aspect fixes the shape, including 3:1 and 4:1 for panoramas.
- Rotate, under the photo in the same editor: quarter turns, plus a fine straightening slider. Straightening pulls your crop in just far enough to keep black corners out, and lets it grow back as you level towards 0°. A quarter turn carries the crop round with the photo.
- Reset gives the original back: the whole frame, upright and level.
- The crop shows everywhere a photo is drawn — grid, viewer, map — and the thumbnail is remade from the original, so a tight crop stays sharp in the grid.
- The crop travels. It is written in the form Lightroom, Photoshop and Bridge read, so a photo cropped here opens cropped there, and one cropped in Lightroom shows cropped here. Tagging or geotagging a photo someone else cropped leaves their crop alone.
An exported photo already has its crop and adjustments baked in, and says so in its metadata, so Photo Flux shows it as it is. If you crop one here, Photo Flux keeps the crop — but Lightroom and Photoshop ignore it, because they treat that file's edits as already done. Such a photo opens uncropped in Lightroom. Photos of this kind imported by an earlier version may appear cropped twice; Reset in the crop & rotate editor puts them right.
Edit
Actions → Edit opens the Edit panel beside the photo on screen. It is free (all but Effects, Vignette, Grain, Optics and Geometry, which are Pro), and non-destructive like the crop: the file keeps every pixel it arrived with. The panel takes room from the photo rather than covering it — along the bottom when the phone or tablet is upright, down the left side when it is turned sideways — and turning the device moves it. The photo shrinks to fit beside it, and goes back to fit when the panel closes.
Every adjustment in the Edit panel works on the picture as it was saved: the JPEG, or, for a RAW file, the JPEG preview the camera puts inside it. Photo Flux never reads a RAW's sensor data. So the adjustments have what a JPEG has to work with: a highlight that is already pure white can be darkened to grey but can't get its detail back, a shadow that is pure black stays black, and white balance has no Daylight or Tungsten settings. For the full latitude of the raw data, edit the RAW in Lightroom or another raw editor; your edits here travel to it (see Where the edits go).
For more room for the sliders, the button to the right of before and after makes the panel bigger: twice as wide down the side, or half the screen tall along the bottom (where it also hides the histogram). Tap it again to put the panel back.
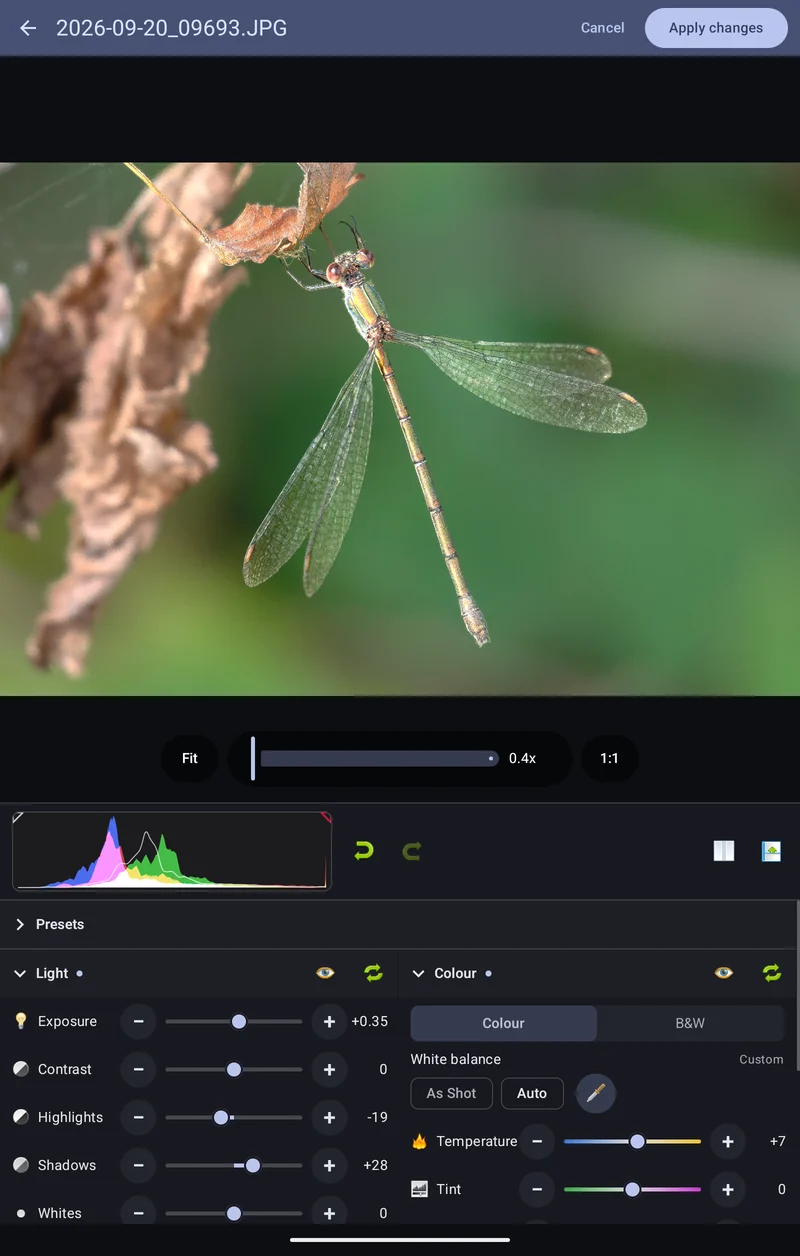
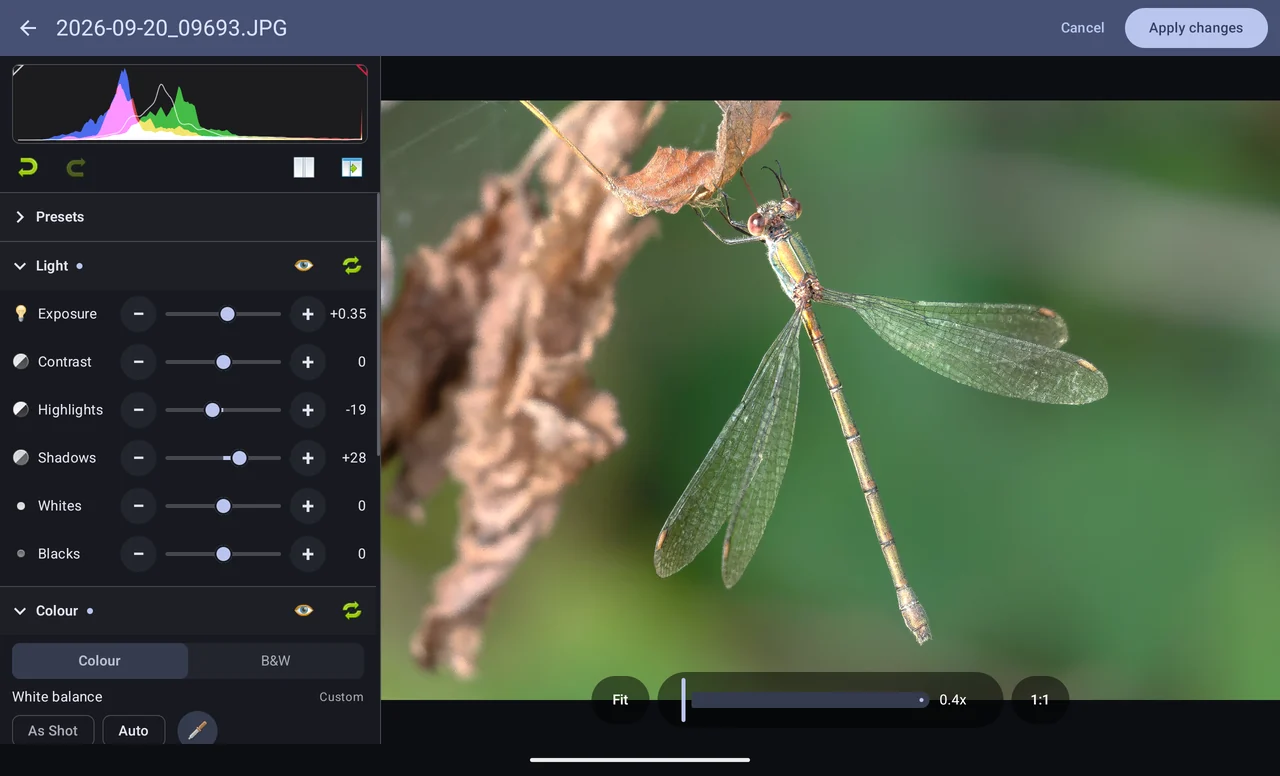
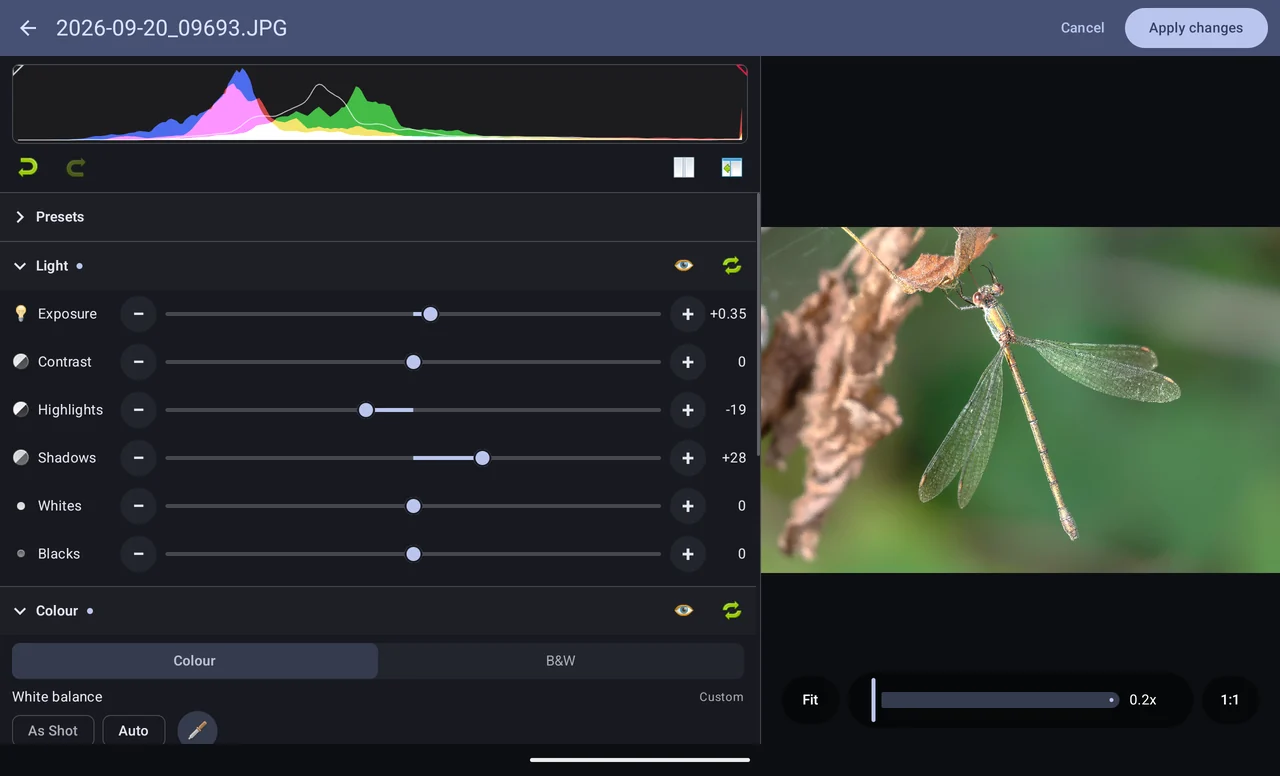
The adjustments are in sections — Light, Colour and, below them, Tone Curve. Tap a section's name to fold it away or open it again; Photo Flux remembers which are open.
- Light
- Exposure (in stops), Contrast, Highlights and Shadows (the bright and dark parts on their own), Whites and Blacks (the very brightest and darkest).
- Colour
- White balance, then Temperature (cooler or warmer), Tint (greener or more magenta), Vibrance (more colour where there is little, sparing what is already vivid and skin tones) and Saturation (more or less colour everywhere).
- Drag a slider and the photo changes as you drag, sharpening a moment after you let go. Tap − or + either side of it to nudge the value by one (by 0.05 of a stop for Exposure). Tap the number, or double-tap the slider, to put it back to zero.
- White balance: As Shot puts Temperature and Tint back to the photo as taken. Auto makes an estimate by assuming the photo averages out to grey — good for an ordinary scene, misled by one full of a single colour, such as a sunset. For a sure answer, tap the eyedropper, then something in the photo that should be white or grey: Temperature and Tint are set to make it so. Tap another spot to try again, and the eyedropper again when you're done.
- The histogram at the top shows how bright the photo's red, green and blue are, with a white line for overall brightness. Its two top corners are clipping warnings: a corner turns blue or red when shadows or highlights are clipped — pure black or white in a colour, with no detail left — and tapping it marks those parts of the photo in that colour.
- Before and after: press and hold the button beside Undo and Redo to see the photo with no adjustments at all. Let go to come back.
- Each section has a dot beside its name when it changes the photo, an eye that turns that section's changes off for a moment so you can compare (it doesn't remove them, and they are still kept when you apply), and a reset that puts the whole section back to zero.
- Undo and Redo step back and forward through what you've done since the panel opened.
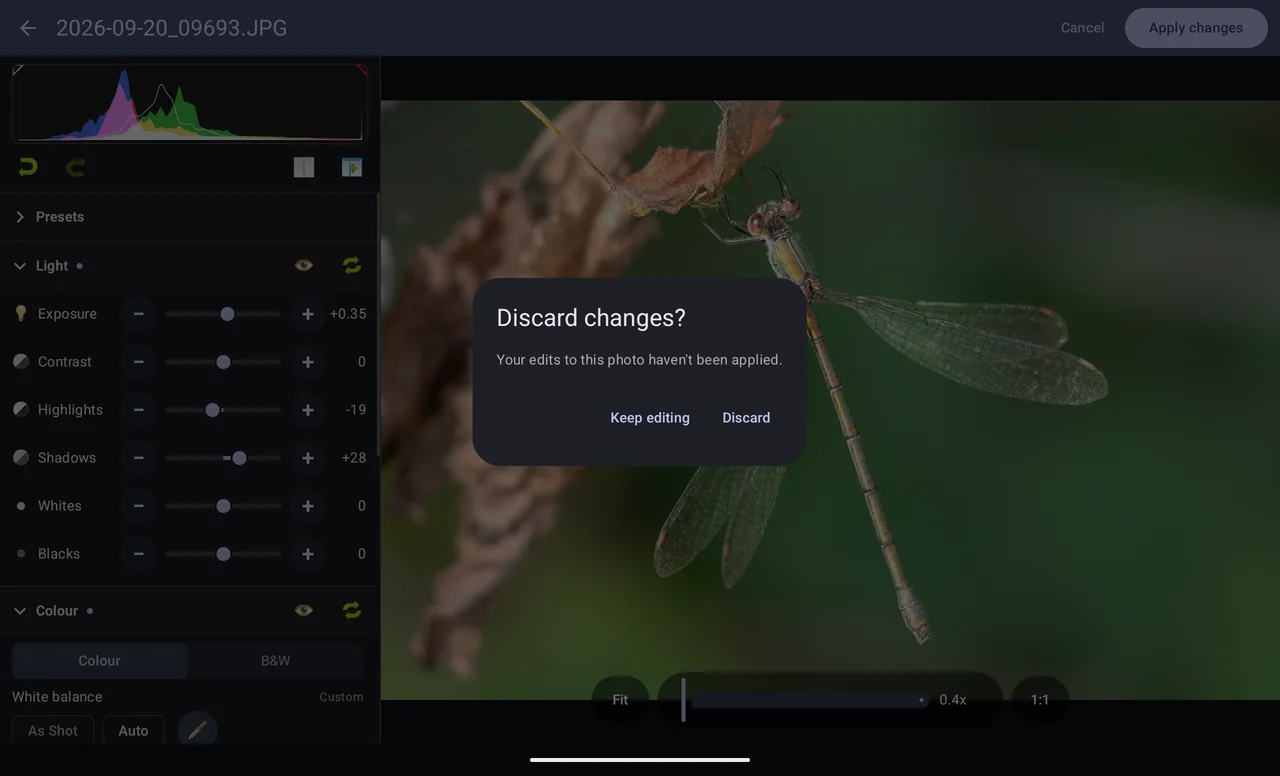
- While the panel is open the viewer stays on that one photo, and the top bar shows only Cancel and Apply changes. Apply changes keeps everything and remakes the thumbnail; Cancel throws it all away. Back does the same as Cancel, but asks first if you've changed anything. You can still pinch and double-tap to look closely.
Colour Mixer
Colour Mixer, the section after Colour, changes eight colours on their own — red, orange, yellow, green, aqua, blue, purple and magenta — each by its Hue (turning it towards its neighbours), Saturation and Luminance (brighter or darker). Pick Hue, Saturation or Luminance to see that slider for all eight colours, or tap a colour's dot to see its three. Each slider's track shows what it does. Colours in between two of the eight belong to both, so there are no hard edges; and anything grey is left alone, whatever its surroundings.
Colour Grading
Colour Grading tints the photo's shadows, midtones and highlights, or all of it (Global), one wheel at a time. Drag on the wheel: round it picks the colour, out from the middle how strong. Under the wheel, Luminance makes that range lighter or darker, and Hue and Saturation set the wheel exactly. Balance moves where shadows end and highlights begin; Blending, how far each range reaches into the next.
Lightroom keeps the shadow and highlight colours in its older split-toning settings, so an older version of Lightroom shows them as Split Toning rather than Colour Grading.
Black and white
At the top of Colour, Colour and B&W switch the photo between colour and black and white. In black and white, Vibrance and Saturation have nothing to work on and grey out, and the Colour Mixer section becomes the B&W Mix: a slider for each of the eight colours, setting how light or dark that colour turns out in grey. Colour Grading still works, to tone a black and white.
Tone Curve
Tone Curve is its own section, below Colour. Its tabs pick what you're shaping:
- Parametric: four sliders — Highlights, Lights, Darks and Shadows — each lifting or lowering its part of the range. The three handles under the graph move where one part ends and the next begins.
- RGB, R, G and B: a curve you draw, on every colour at once or on red, green or blue alone. Press on the curve and drag to add a point and move it; press near a point to move it again; drag a point off the graph to remove it. The two end points move only up and down.
The curve works after the Light sliders, as in Lightroom, and the photo's histogram shows faintly behind it.
Effects Pro
Effects works on detail and atmosphere; Vignette and Grain, the two sections after it, on the finished photo's look.
- Texture brings out (or smooths) fine detail — brickwork, leaves, fabric — without changing the overall contrast.
- Clarity does the same at a larger scale, mostly in the midtones, for a punchier look; below zero it softens.
- Dehaze cuts through haze and mist in a distant view; below zero it adds a soft, misty look. It is Photo Flux's own, so expect it to differ from Lightroom's in strength.
Vignette Pro
Amount darkens (or, to the right, lightens) the edges of the photo as cropped. Midpoint sets how far in it reaches, Roundness its shape — from the photo's own shape to a circle or a rounded rectangle — Feather how soft its edge is, and Highlights keeps bright areas such as sky from greying. The others are greyed until Amount is moved. Unlike Optics' lens vignetting, it follows the crop.
Grain Pro
Amount adds film-like grain; Size sets how big each grain is and Roughness how even. A photo keeps the same grain every time it is shown, shared or exported.
Effects, Vignette and Grain scale with the photo, so a thumbnail, the viewer and a full-size export all look alike. Lightroom reads them all; its own Clarity now shows here too.
Optics Pro
Optics corrects faults of the lens, across the whole frame before it is cropped.
- Lens vignetting: Amount lightens dark corners (or, below zero, darkens them). Midpoint sets how far in from the corners it reaches: lower reaches further.
- Defringe: takes out the purple or green edges a lens leaves along sharp light-dark boundaries, such as branches against a bright sky. Purple and Green set how strongly; Hue from and Hue to set which shades count. Only colour right beside a hard edge is affected, so a purple flower or a green leaf keeps its colour.
Lens profile corrections and automatic chromatic aberration removal aren't offered. They need Adobe's lens database, and camera JPEGs are usually corrected in the camera already.
Geometry Pro
Geometry straightens buildings and corrects lens distortion by reshaping the whole picture.
- Distortion: to the right pinches a picture that bulges outwards (barrel distortion); to the left bulges one that pinches.
- Vertical and Horizontal: correct perspective. Shooting a tall building from below makes its sides lean in; move Vertical to the left until they stand straight. Horizontal does the same for a wall shot from one side.
- Rotate turns the picture by a few degrees; Aspect stretches it wider or taller, useful when a corrected building looks squat; Scale zooms in or out; Offset X and Offset Y move it.
The crop keeps up. Correcting perspective or distortion pulls the picture away from the edges of the frame. Photo Flux pulls the crop in just far enough that nothing blank ever shows. Ease the correction back before you apply it and the crop grows back. After you apply, the smaller crop is the photo's crop: widen it again in Crop & rotate, which shows the corrected picture.
Guided Upright. Tap Guided Upright and draw two to four lines on the photo along edges that should stand straight up or lie level: the sides of a building, a horizon, a doorframe. A line drawn nearer upright is straightened to vertical, otherwise to level. Drag the end of a line to move it; tap a line and Delete line to remove it. Photo Flux works out Vertical, Horizontal and Rotate from the lines as you draw. Two lines along a building's sides set Vertical and Rotate; add a level line to set Horizontal too. Preview shows the result. Apply puts the values on Geometry's sliders, where you can fine-tune them.
Light, Colour and the Tone Curve are free. Effects, Vignette, Grain, Optics and Geometry are Pro: on Free they open so you can see what they offer, but their controls are greyed out under a note that they are Pro features, and tapping them opens Free and Pro. A photo that already has values there — set in Lightroom, say — still shows them.
Presets and copying edits Pro
Presets, at the top of the panel, saves a look to use again. Save preset asks for a name and which sections to include — everything but Geometry is ticked to start with, since Geometry is about one photo's own framing. Tap a saved preset to apply it; only its sections change, and Undo takes it back in one step. Use the ⋮ menu beside a preset to rename or delete it.
Copy settings and Paste settings do the same from one photo to the next, without saving anything: copy from the photo you're editing, open another, paste. They are also in the viewer's Actions (Copy edit settings, Paste edit settings), which apply straight away, and a gallery selection can take a paste all at once — see Paste edit settings. Copied settings last until Photo Flux closes.
- A setting the copied photo left at zero puts this photo's back to zero, but never adds a value this photo didn't have.
- Guided Upright's lines are never copied: they were drawn on another photo.
- The crop isn't copied, but pasted Geometry may pull this photo's crop in so no blank edge shows.
- Pasted grain gets a pattern of its own, so two photos never share one.
Where the edits go
- Edits show everywhere the photo is drawn — grid, viewer, map, Comparison Reject — and when you share it or export it as an edited JPEG. Sharing or exporting the original file sends it untouched.
- They travel, mostly. Everything but white balance is written in the form Lightroom, Photoshop and Bridge read, and values set there show here. White balance on a JPEG travels the same way. On a RAW it doesn't: Lightroom records a RAW's white balance as an exact colour temperature worked out from the camera's own setting, which Photo Flux can't read, so the RAW keeps Photo Flux's white balance to itself.
- Changing one adjustment never touches the others, or anything else Lightroom set.
- Guided Upright's lines stay in Photo Flux. Lightroom opens the photo with the Vertical, Horizontal and Rotate they worked out, as ordinary Geometry values, but doesn't show the lines. Lightroom's own automatic Upright modes can't be read here.
- Photo Flux's own look, not Adobe's. The numbers mean the same things, but each program applies them its own way, so expect a photo to look a little different in Lightroom.
- Photo Flux edits the picture as it was saved — the JPEG, or the preview a camera puts inside a RAW — not the raw sensor data. A highlight that is already pure white there can be darkened to grey but can't get its detail back. That is also why white balance has no Daylight or Tungsten settings: Lightroom offers those only when it works from raw data.
- On a photo exported from Lightroom or Photoshop, whose settings are already baked into its pixels, Photo Flux keeps its adjustments in its own fields beside Lightroom's record, the same way it does the crop — see the note under Crop and rotate.
Sharing
Both Share actions hand the photo to another app through Android's share sheet — a messaging app, an email, a cloud drive.
- Share
- Sends one picture per photo, as it looks on screen — cropped and rotated. An uncropped photo goes as its original file. For a RAW, the picture is its extracted preview JPEG (or, failing that, its paired JPEG, or the RAW itself, which a messaging app may not show). Right for a message or a post.
- Share Originals
- Sends every file the photo is made of, untouched: the RAW, the JPEG beside it,
and the
.xmpholding your tags, title, event, location and crop. Nothing is re-encoded — not even an edited photo — so what arrives is byte for byte what you have. Meant for keeping: a cloud backup, or another computer.
If a profile uses Export processing, both send a cleaned copy instead, with its location taken out of the standard fields. A file that can't be cleaned is left out, and Photo Flux tells you.
A camera maker's private notes can hold a position too. If a cleaned copy may still carry them, Photo Flux asks before the share sheet opens: Private maker notes may remain, with Share anyway or Cancel. A RAW always keeps its notes. A JPEG keeps them unless the profile's Remove maker notes from JPEGs is on. If you share RAWs often, tick Don't ask again for this profile; the profile's Ask before sharing files with maker notes turns the question back on.
Sharing a photo to Google Photos uploads the original file. Google Photos' Free up space then treats it as backed up and can delete it from the phone — including from Photo Flux's folders. Photo Flux still lists the photo, with nothing behind it. Rescan metadata finds and removes these.
Everything else in the viewer
- Export — send it through a connector.
- View image on map, Move location on map — Chapter 10.
- Find similar images — look-alikes of this photo.
- Set metadata — tags, location, event and title for this one photo. Chapter 7.
- Move to album, Copy to album — Chapter 8.
- Remove, and for a RAW+JPG pair outside an album, Remove RAW and Remove JPG to delete one half and keep the other.
Opening a RAW whose preview (or paired JPEG) has gone offers to make a new preview from the preview embedded in the RAW itself. A few RAW files carry none; the viewer says so.